Most wooden gates end up sagging, dragging on the ground, or just looking crooked. This is gate number four on my property, and the first three are still holding up perfectly because they all use the same method. Here’s the full build, the one trick that keeps a gate square, and a hidden latch you can’t see from the outside.
What you’ll learn
- How to measure and size a gate so it fits without binding
- How to build the frame with half-lap joints
- Where the diagonal brace goes, and why the direction is everything
- Why the brace should be in compression, not tension
- How to choose and install your hinges
- How to add a pull latch, and how to hide it
Start with the posts and the hinge side
Before you cut anything, decide which way the gate is going to open, because that tells you where the hinges go. Mine swings so the hinges are on this post.
The posts have to be solid. I’m using 4x4s set 32 inches deep in concrete. A gate can only be as stable as the post it hangs from.
How to measure a gate opening
I want the frame about half an inch smaller than the opening. This opening is 26 inches wide, so the frame is 25½ inches. Take a few different measurements, and if you’re not sure, leave a full inch of clearance.
On my other gates I left a 1-inch gap because of the style of latch I used. This one leads to a changing room and I wanted more privacy, so I kept it tighter.
For the height, I made the frame 64 inches so it lines up with the top and bottom rails of the fence. The whole thing looks much cleaner that way.
Cutting the frame
I’m using 2x4 pressure-treated pine. Cut the two verticals to 64 inches and the two horizontals to 25½ inches.
Half-lap joints
Lay one board on top of the other, make sure the frame is square, and mark where material needs to come out. Find the center so each board loses exactly half its thickness. Set the circular saw to that depth, make your cuts, break out the waste with a hammer, and clean it up with a chisel.
The results weren’t as clean as I wanted, so I tried my new miter saw, which I got secondhand on Marketplace for 150 bucks. Set the blade depth until it touches your line and use the stop. The result was incredible compared to the circular saw.
It took about 5 minutes per joint, and I had eight to do, so around 40 minutes. That’s still a lot quicker than the circular saw and chisel method. You could do all of this with a handsaw and hand tools if that’s what you have.
Assembling and squaring the frame
Dry-fit everything first and check that the frame fits the opening. Then check it for square by measuring from one corner to the opposite corner, and again on the other diagonal. Mine measured 68¾ inches both ways, so I knew it was perfectly square.
Add another screw at each joint, then lift the pieces apart and add quick-set epoxy. The screws hold it, but the epoxy is a reassurance that nothing will shift over time. You could also use Titebond III, which is waterproof. I used 5-minute epoxy on my other gates and it has worked well, so I used it again.
Why gates sag, even with brackets
If you’re looking at this frame and thinking it’s strong enough to be a gate, you’d be wrong. Half-lap joints are probably overkill, and you could just use the metal brackets they sell online. But even with brackets, gates still sag, and it comes down to one thing: the diagonal brace, either missing or put in the wrong way.
Where the diagonal brace goes
I still see videos online that don’t show this the right way, so here’s my hangman explanation.
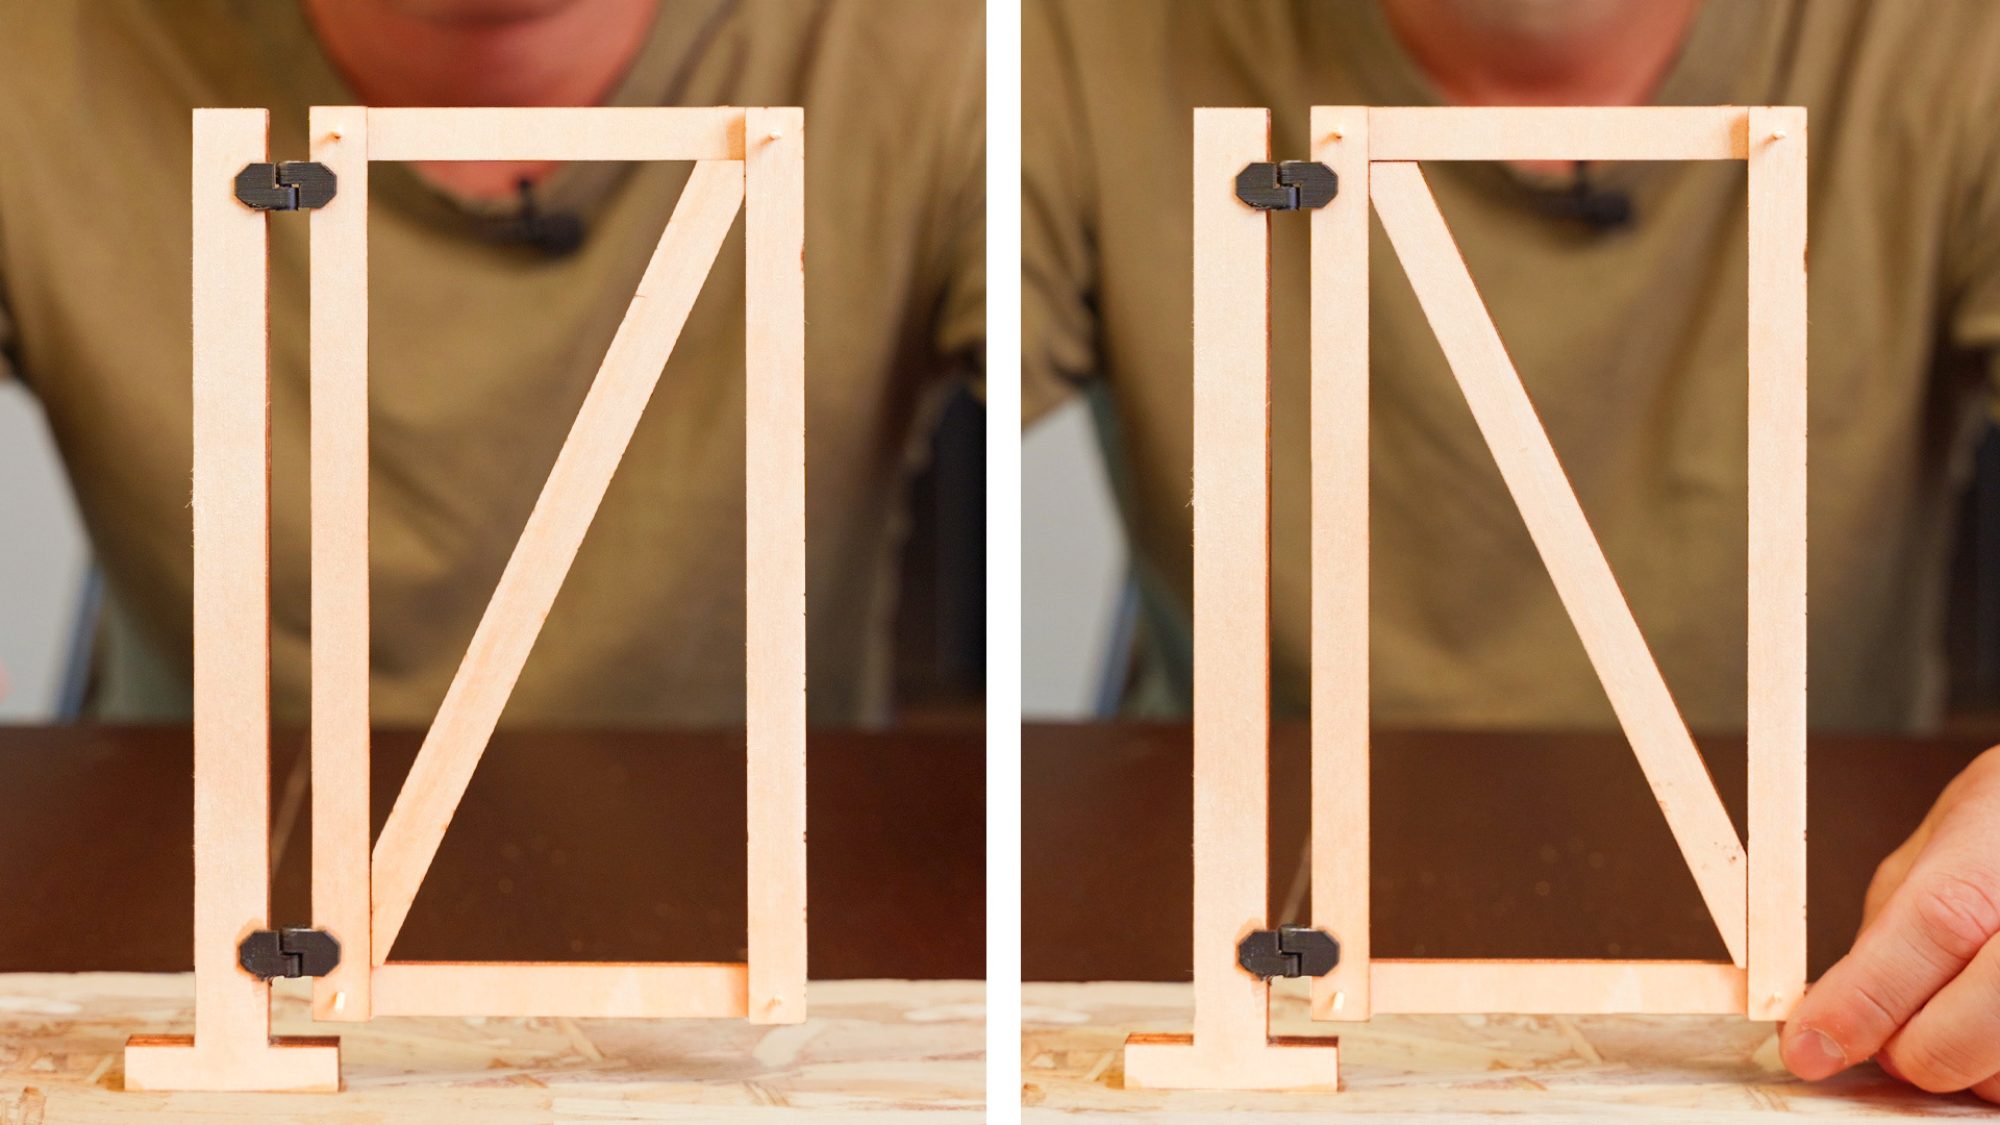
Picture the gallows. The post is your hinge side, and the arm sticking out is your gate. The little brace holding that arm up runs from the post out to the arm. Flip it and it holds nothing. A longer brace that starts low on the post holds even more weight.
On a gate, that means the diagonal starts at the lower hinge and runs all the way up to the top corner on the other side. The weight travels down the brace, into the bottom hinge, and into the post, which is the part built to hold it.
Fastening the brace
I fasten the brace with 4½-inch screws driven in at an angle. But a properly placed brace holds the gate up on its own. One screw at each end just keeps it in place, because the wood is doing the work, not the fasteners.
Compression vs. tension: why direction matters
I spent a whole day building a miniature model of the gate to show this. With the brace in the correct direction, I could push on it and even put my bottle of Cholula on top, with not a single screw installed. It holds, because the wood is in compression.
Flip the brace the other way and the wood is in tension. Now you’re relying 100% on the screws or brackets. As soon as I let go, the whole gate fails.
The best way to handle tension is a metal cable, and you can buy cable kits that do exactly that. So if your gate is already sagging, adding a brace in compression, or a tension cable, is probably your fix.
A wider gate works the same way. Even when I pushed down hard enough that the post sagged and the hinges were about to break, the gate itself didn’t sag.
Hanging the gate
Start with the top hinge
Install the top hinge first. One upgrade worth making is longer screws, since the ones that come with hinges are quite small for what they hold up.
Side-mounted vs. strap hinges
This gate is on a corner post and the way it swings meant I had to use side-mounted hinges instead of the exposed strap hinges on my other gates. I forgot to film it, but I used a clamp and some shims to hold the gate in place while I installed it.
Match your fence style
Depending on your fence, you might need to install a picket on the frame before hanging the gate. On this one, I had to put the picket on first to keep everything flush with the rest of the fence.
Installing a spring pull latch
I bought two of these little spring-loaded latch kits, one for each side, so I’m not always opening the gate overhand. That also means shorter people and the kids can reach it. The kits come with no instructions, so I figured it out as I went: line up the hole at the top, pass the cable through, hook it in, then add the spring.
Building a hidden latch
This gate is accessed from the front yard, so I wanted the latch as hidden as possible. I ran the cable at a 45° angle to pass behind a half picket, with the pull string behind it.
I needed something to hold the string in place, so I used a little 3D-printed piece I had made for my drill holder, with a hole at each end. It worked perfectly for this.
I’ve wanted to build a secret opening for a long time, and it came out better than I expected. From the outside, it’s completely invisible. When my family got home, I told them to try and find the opening.
Gate building FAQ
Which way should a gate brace go?
From the lower hinge up to the top corner on the opposite (latch) side, so the wood is in compression.
Do you need a lot of screws on a gate brace?
No. A correctly placed brace holds the gate up by itself. One or two screws at each end keep it in place.
How much clearance does a wood gate need?
I use about half an inch total on a tight gate. If you’re not sure, leave a full inch.
How do I fix a sagging gate?
Add a diagonal brace from the lower hinge to the top latch corner, or use a tension cable kit.


